Neovim
Neovim is installed by default and used as a default editor.
Changing Neovim config
By default, I clone my personal Neovim config, which is using AstroNvim Neovim distribution.
You can use your own config - either entirely different, or you can fork my config and tailor it to your needs.
Neovim config is defined in variables as below:
neovim_config_url: https://github.com/Ziwi01/astronvim.git
neovim_config_version: main
neovim_config_appname: astronvim
The config will be cloned into $HOME/.config/{{ neovim_config_appname }}
AstroNvim
Inside Vim, the main key (leader key) is <Space> - most of the shortucts start with that.
Plugins
Below list is not comprehensive - it needs to be updated with all used plugins description
Some example plugins used in this config:
- nanotee/zoxide.vim - Zoxide inside VIM:
:Zior:Z <query>.For Zoxide descrption see above for Zoxide description - will133/vim-dirdiff - Diff directories. (
:DirDiff <dir1> <dir2>) - Sid0fc/mkdx - Markdown support
- junegunn/fzf and junegunn/fzf.vim - FZF integration in VIM
- tpope/fugitive - Git wrapper, execute any Git command from VIM
- kdheepak/lazygit.nvim - Neovim integration with awesome GIT wrapper (LazyGIT). See
softwarerole description for details. - mhinz/vim-signify - shows GIT info about modified/added/removed lines
- f-person/git-blame.nvim - show Git blame in-line virtual text.
- junegunn/gv - show git commits graph
- rmagatti/goto-preview - do not jump around the definition in new tabs/buffers - show floating preview window and edit it there, close the preview. Being on top of searched function:
gpd(for definition). - auto-save.nvim - exactly what the name suggests.
- preservim/vimux - integrate neovim with TMUX - run commands in splits easily (@TODO: Add keymappings)
- christoomey/vim-tmux-navigator - integrate movements between TMUX splits and VIM windows/splits
- towolf/vim-helm - Helm files support
- kevinhwang91/nvim-bqf - much better quickfix window
- wincent/ferret - Search and replace for files in your project. To be used if Spectre doesn't work as expected (see LunarVim usage docs for details)
- roobert/search-replace.nvim - Better local search and replace
There is also AstroNvim community repository, where you can find plugins tailored and configured for AstroNvim.
I use couple of them as they provide seamless integration with AstroNvim ecosystem. For the whole list of plugins used see community.lua file.
See below examples of community plugins used:
- folke/trouble.nvim - Toggle diagnostic windows and browse through them (
<Space>twill list options to open) - jvgrootveld/telescope-zoxide - Use Zoxide inside vim
- ggandor/leap.nvim - Jump around the buffer like crazy
- nvim-pack/nvim-spectre - Search and replace like on other IDEs
- sindrets/diffview.nvim - great GIT diff plugin for comparing file tree with particular revision(s) or browse file/selection history
- RRethy/vim-illuminate - highlight all the words that the cursor is on right now. Handy for typo spotting.
Keymappings
Uses: nvim-whichkey
After hitting <Space> (or a key from which a keymap starts), the popup will show available keymaps which begin with the key you pressed. You can customize those keybindings, add new, remove etc. - see whichkey docs.
To get the whole list of keymaps you can browse them with :Telescope keymaps
File browser
Uses: NeoTree
Toggle file browser with <Space>e. The root of the tree will be set to the project of the current file (project is any parent directory with .git, node_modules etc.).
You can change focus from the tree to file with <Alt>+<arrows>.
Useful shortcuts:
?: open help<Enter>: go into/open directory, open file.: go into directory and make it root.P: preview file (open buffer, but don't focus on it. Any other<TAB>will use the same buffer)<Backspace>: go up the directory treez: fold all nodes<Shift+F>: find files in directorys: Open file in vertical split. Useful to compare two files - open in split, close the tree (<Space>e), and compare::windo diffthis
Switch buffers around
You can switch around opened buffers with <Shift>H (left) or <Shift>L (right).
Also you can pick the buffer from a fuzzy search with <Space>bf. From this view, <Enter> will just open the file, but <Ctrl>+<Shift>+v will open that buffer in a vertical split.
Jump to last opened buffer
Use <C-6> to jump between last edited place (buffer).
Close opened buffers
To close the buffer you are in: <Space>c.
You can also close all buffers except the one you're in:
<Space>bh: close all buffers to the left<Space>bl: close all buffers to the right<Space>bD: pick a buffer to close (buffer icons will turn into letters, pick one to close that buffer)
Diff opened buffer to current file
- Open a buffer in split:
<Space>fb: find buffer- Select buffer,
<Ctrl>+<Shift>+v: Open in split - (if opened) Close NeoTree:
<Space>e :windo diffthis: start diff
To close the diff either close any buffer with <Space>q
To only stop the diff: :diffoff
In the diff window you can use below to jump around:
]c: jump to next change[c: jump to previous change
Or apply changes between windows:
:diffput: put this change in adjacent window:diffget: get this change from adjacent window
Of course, switch focus between windows with <Alt>+<arrows>
Diff directories
Uses DirDiff
To diff two directories, ensure you are not in NvimTree window, and run: :DirDiff <dir1> <dir2>.
This will open a directory diff window
Example: Diff directories
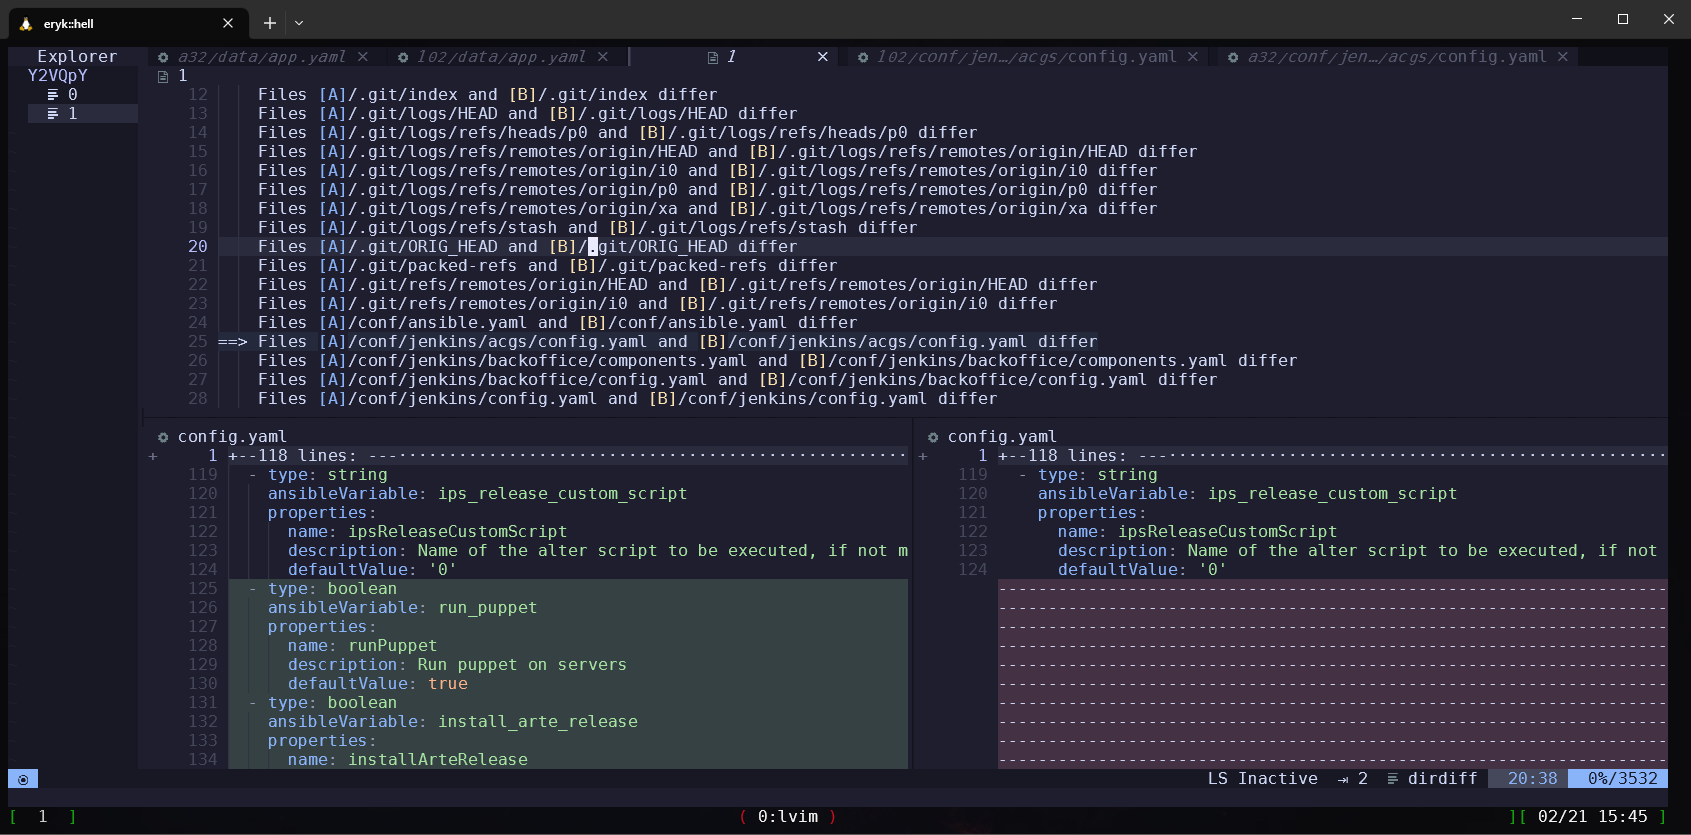
In the DirDiff view you can:
- exclude files with
x. Useful for example for.gitpattern. After excluding runuto update the diff - open diff with
<Enter> - sync the changes with
s. The editor will ask you which changes to accept ('A' or 'B') - to sync multiple files at once, select them with
<Shift>v, then presssto sync.
TODO: Integrate DirDiff with Nvim Tree, introduce simple shortcuts/marks for diffing two directories.
Search and replace
There are couple of methods to do search and replace, each of them has its pros and cons.
Locally
Uses: roobert/search-replace.nvim
TODO: update this
To replace text locally, run:
<Space>ro
It will open a pattern/replace snippet (:%s/<pattern>/<replacement>/gcI)
This will replace every occurence of <pattern> in a current file to <replacement>. Pattern can be a regex, including groups etc.
In above example, some characters, like braces, needs to be escaped in the pattern
You can also replace text in a selection:
- select lines of text with
<Shift>v - hit
<C-s>
Thanks to the plugin listed above, the replacement will happen for each occurence at a time, asking you if you want to apply the replacement or not (y/n/a/q/l).
To quickly replace the word under a cursor: <Space>rw
To see what selections are available under current cursor: <Space>rs
You can also run the replacement for all opened buffers: <Space>rb
Spectre
Uses: nvim-spectre
To replace particular occurences in a whole project, run :Spectre.
Inside Spectre, go into input mode (i) and type the search string. After going to normal mode (ESC) it will search for it.
Each line represents an occurence finding. You can exclude the paticular occurence with dd on the object. You can also do it on on the whole file.
To replace, run <Space>R.
To see more context of the occurence, you can type <Space>q, which send highligted occurences to quickfix window with a preview. Close the quickfix window again with <Space>q
To close Spectre, run :q.
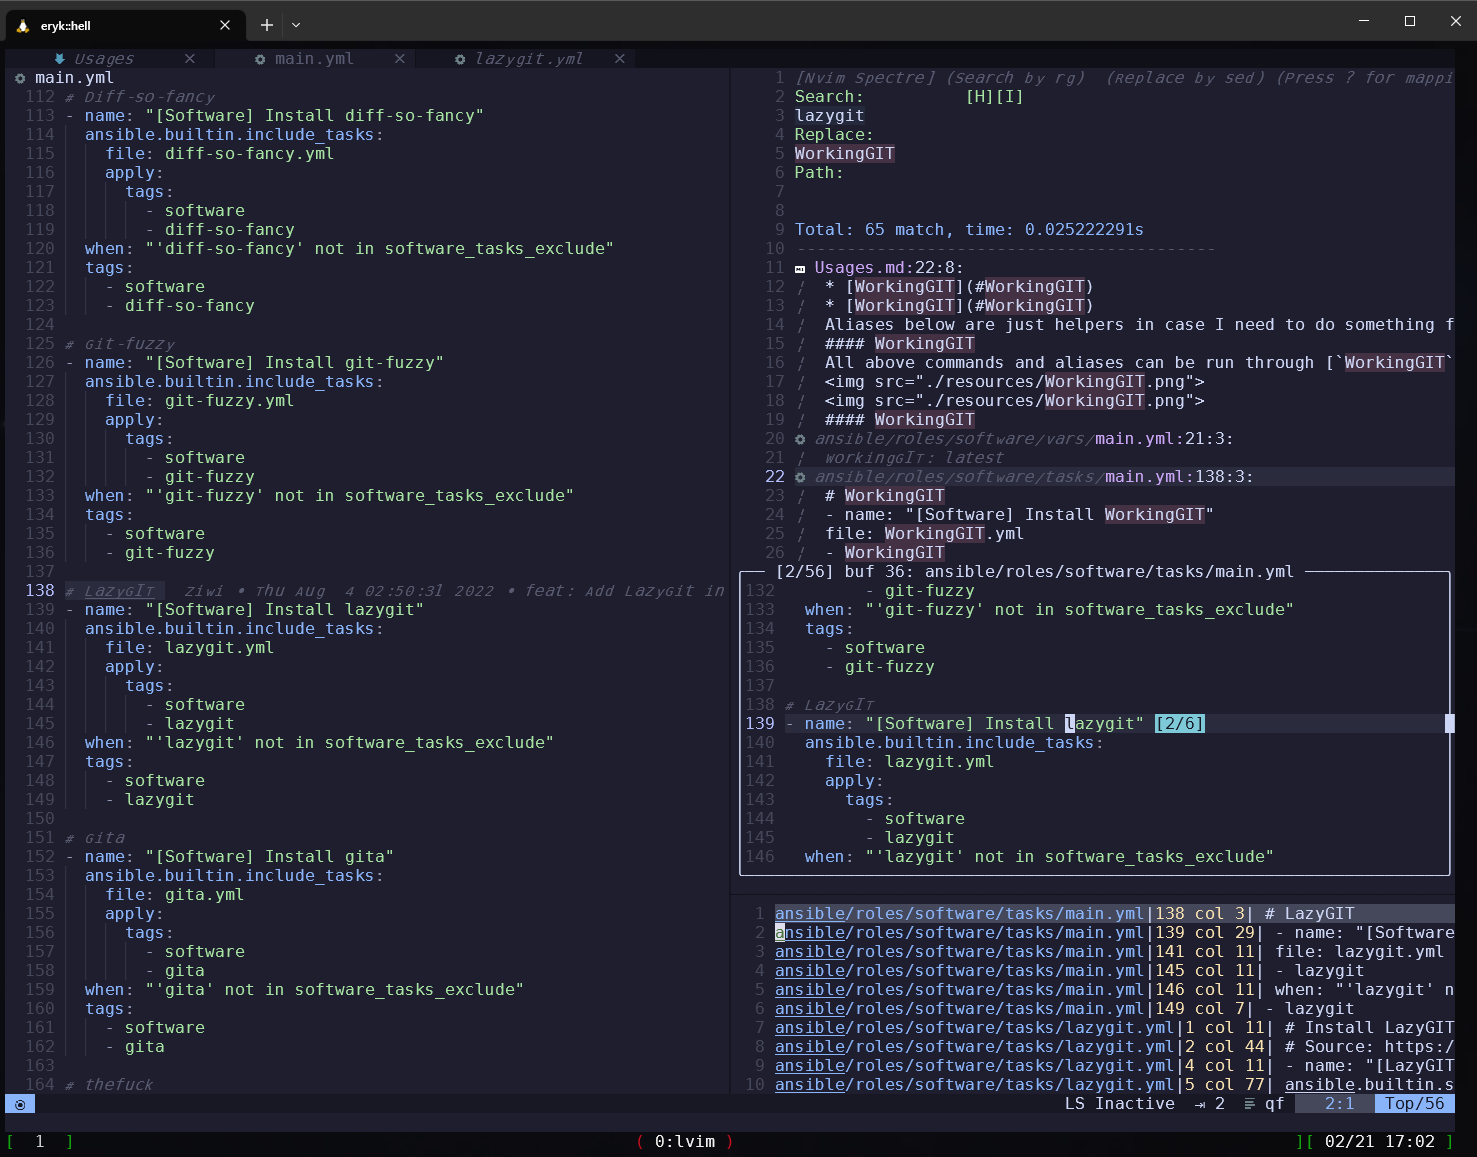
In the example below, there is a search for 'lazygit' with replacement for WorkingGIT, excluding file ansible/roles/software/vars/main.yml, and the search findings are opened in a quickfix preview window
Example: Spectre search
Ferret
Uses: Ferret
This is another search and replace tool. It is easier to use. I use it as a fallback replace engine when Spectre fails (happens sometimes) or does not support it (see Multiline replace) or when I need to replace occurences in currently opened buffers. See Ferret README for more usages.
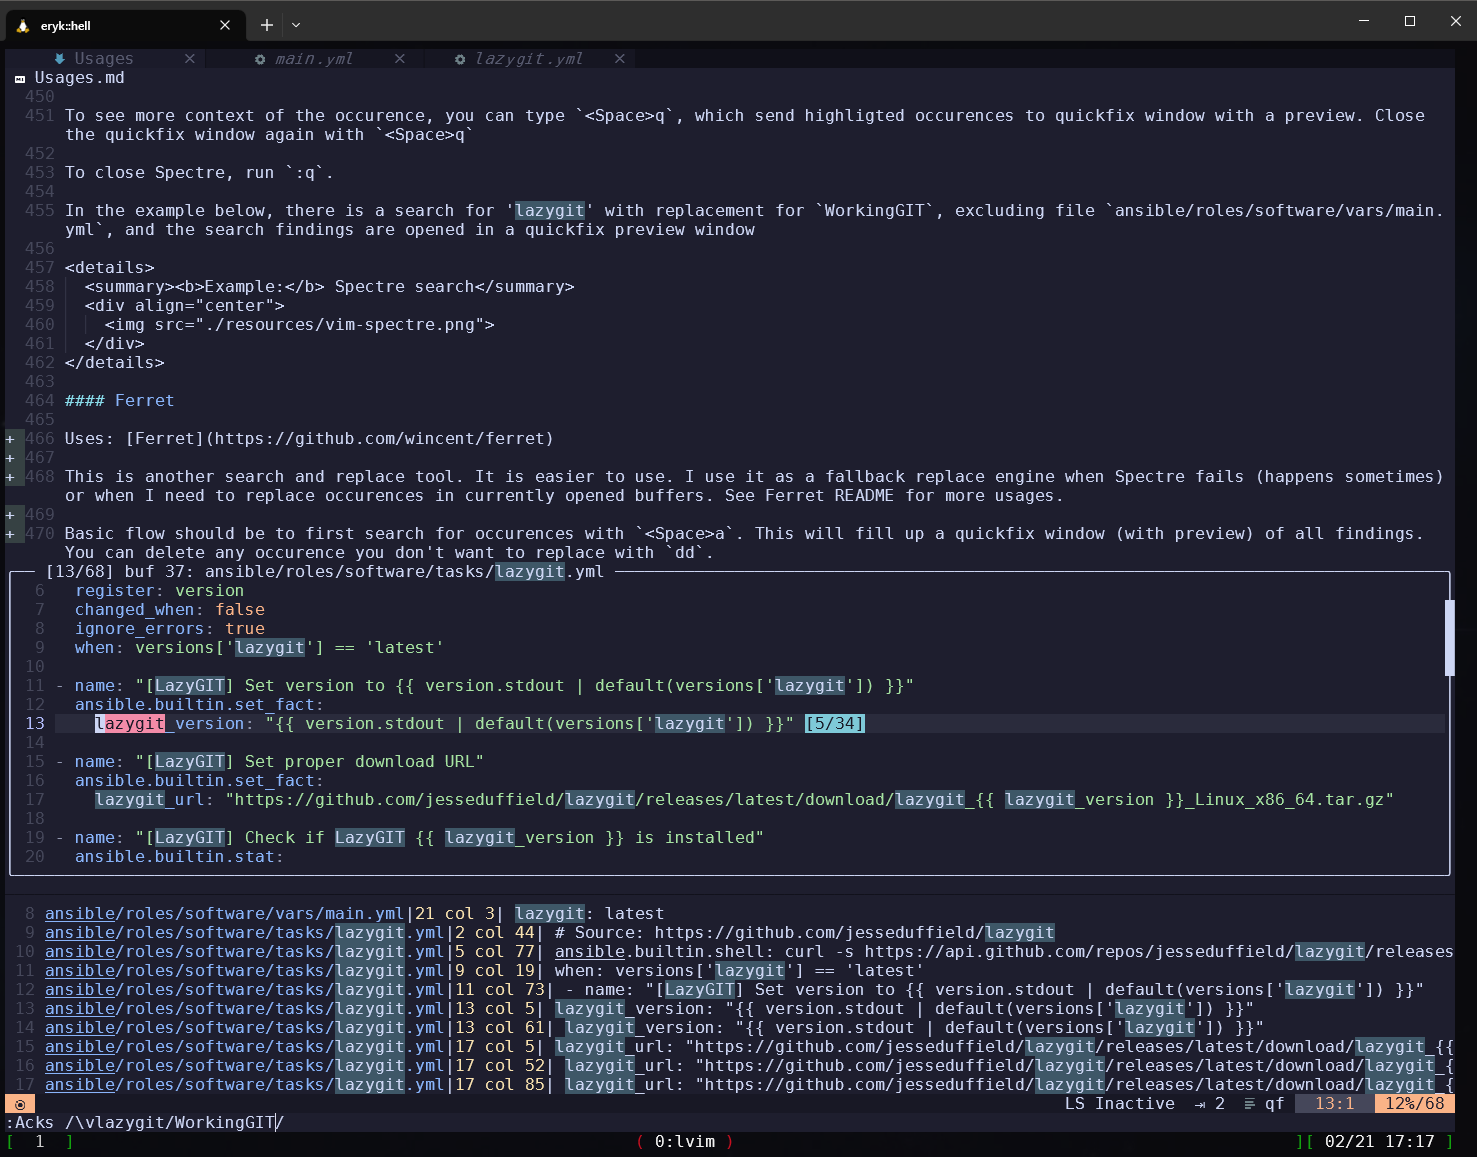
Basic flow should be to first search for occurences with <Space>a. This will fill up a quickfix window (with preview) of all findings. You can delete any occurence you don't want to replace with dd.
After quickfix list is ready, run <Space>r to run replacement pattern.
Unlike Spectre, there is no preview of how the replacement wil look like.
Example: Ferret search
Multiline replace
Spectre does not support it, but with Ferret you can replace a string with multiline string using \r in the substition part.
For example to replace:
text:
  replace: under
to:
text:
  replace: under
  newkey:
    newkey2: value
- Search for string:
<Space>a, search for(.*)(replace:\ under). Brackets here are already regex groups. Space must be escaped. - Above will show you search results. Evaluate them (you can remove entries with
dd) - Replace:
<Space>r, insert replacement string:\1\2\r\1newkey:\r\1 newkey2: value. Here\1is whitespace before the key (first regex group),\2is for old key.\ris newline.
Open recent file
In any buffer you can hit <Space>fo to open the same window.
Find text
To dynamically find text in entire project, run <Space>fw. To include hidden files, run <Space>fW. This will open a fuzzy window with file list and a preview.
You can also used Spectre/Ferret (see above).
Find files
To dynamically find files in a project, run <Space>ff. This will open a fuzzy search window
To find files in a particular directory, open NeoTree (F)
Jumping
Uses: leap.nvim
To jump around your buffer you can use s (leap forward) or S (leap backward).
After S is pressed you need to provide two characters, for where you want jump, and then a character highlighted by leap
For example: to jump to Preview link below, from this place, press s followed by Pr and the third character which will be highlighted there.
You can also jump from insert mode! Press <Ctrl>+O while in insert mode, then s or S, following the pattern (like above) and you are where you wanna be.
See plugin docs for details.
Navigation
TODO: Update below shortcuts
]]: go to next header.<Plug>Markdown_MoveToNextHeader[[: go to previous header. Contrast with]h.<Plug>Markdown_MoveToPreviousHeader
Editing
TODO: Add plugin for ToC support
Resize/pick splits
Navigation through splits is as easy as <Alt><arrows>. This includes Tmux panes also (so you can go out of Vim to other Tmux pane basically).
To resize Vim windows, use <Ctrl>+<arrows>
Align text
Uses: EasyAlign
You can align any text with any character (for example align everything with = or :).
Simply select the text (probably visually with <Shift>v), and run :EasyAlign <char>, e.g :EasyAlign =
More usages can be found in demo
Commands with Vimux
Uses: Vimux
Vimux is an integration layer for terminal (runs a terminal in Vim). See basic usage in above link.
I intend to use it for running tests (rspec, linting, custom verifications), integrating it with fzf and adding some useful shortucts for re-running previous commands, run against current file or for current project
Finish Vimux integration.
Plugin management
Uses: Lazy.nvim
This is a plugin manager.
Open Lazy window with :Lazy. From there you can list, debug, update/sync all the plugins.
It is a good idea to update the plugins from time to time (with s or i from Lazy window).
Along with plugin updates would be good to run LunarVim updates also (see below)
Updates
For plugin updates please see above.
The recommended way is to update AstroNvim using this repository.
Update everything (all software, config files etc.):
ansible-playbook -i inventory.yml setup-windows.yml -k
Or update Neovim config only:
ansible-playbook -i inventory.yml setup-windows.yml -k --tags 'neovim,neovim-config'
Manual updates can be done instead of running ansible:
:AstroUpdate: will update astroNvim core and core plugins. After update often you need to run:Lazy update:TSUpdateSync: will update Treesitter parsers
GIT
Uses:
See below git related operations from inside Vim.
Diff current changes
To quickly preview current GIT changes, use fugitives :Gvdiff or <Space>gd. This will open a vertical split with all the local modifications.
On the left hand side (in the gutter column), there are indications if the chunk of code was added/removed/modified (+/-/!). You can preview those changes with <Space>gp
See more options by invoking whichkey for git operations: <Space>g
Those include:
- checkout branch/commit
- see git blame for this line
- go to next/previous hunk (change)
- reset hunk/buffer
- stage hunk
Diffview opens in separate tab, you can switch the tab(s) with gt (next tab) and gT (previous tab).
To close it, use :DiffviewClose or simply :tabc
Diff another branch
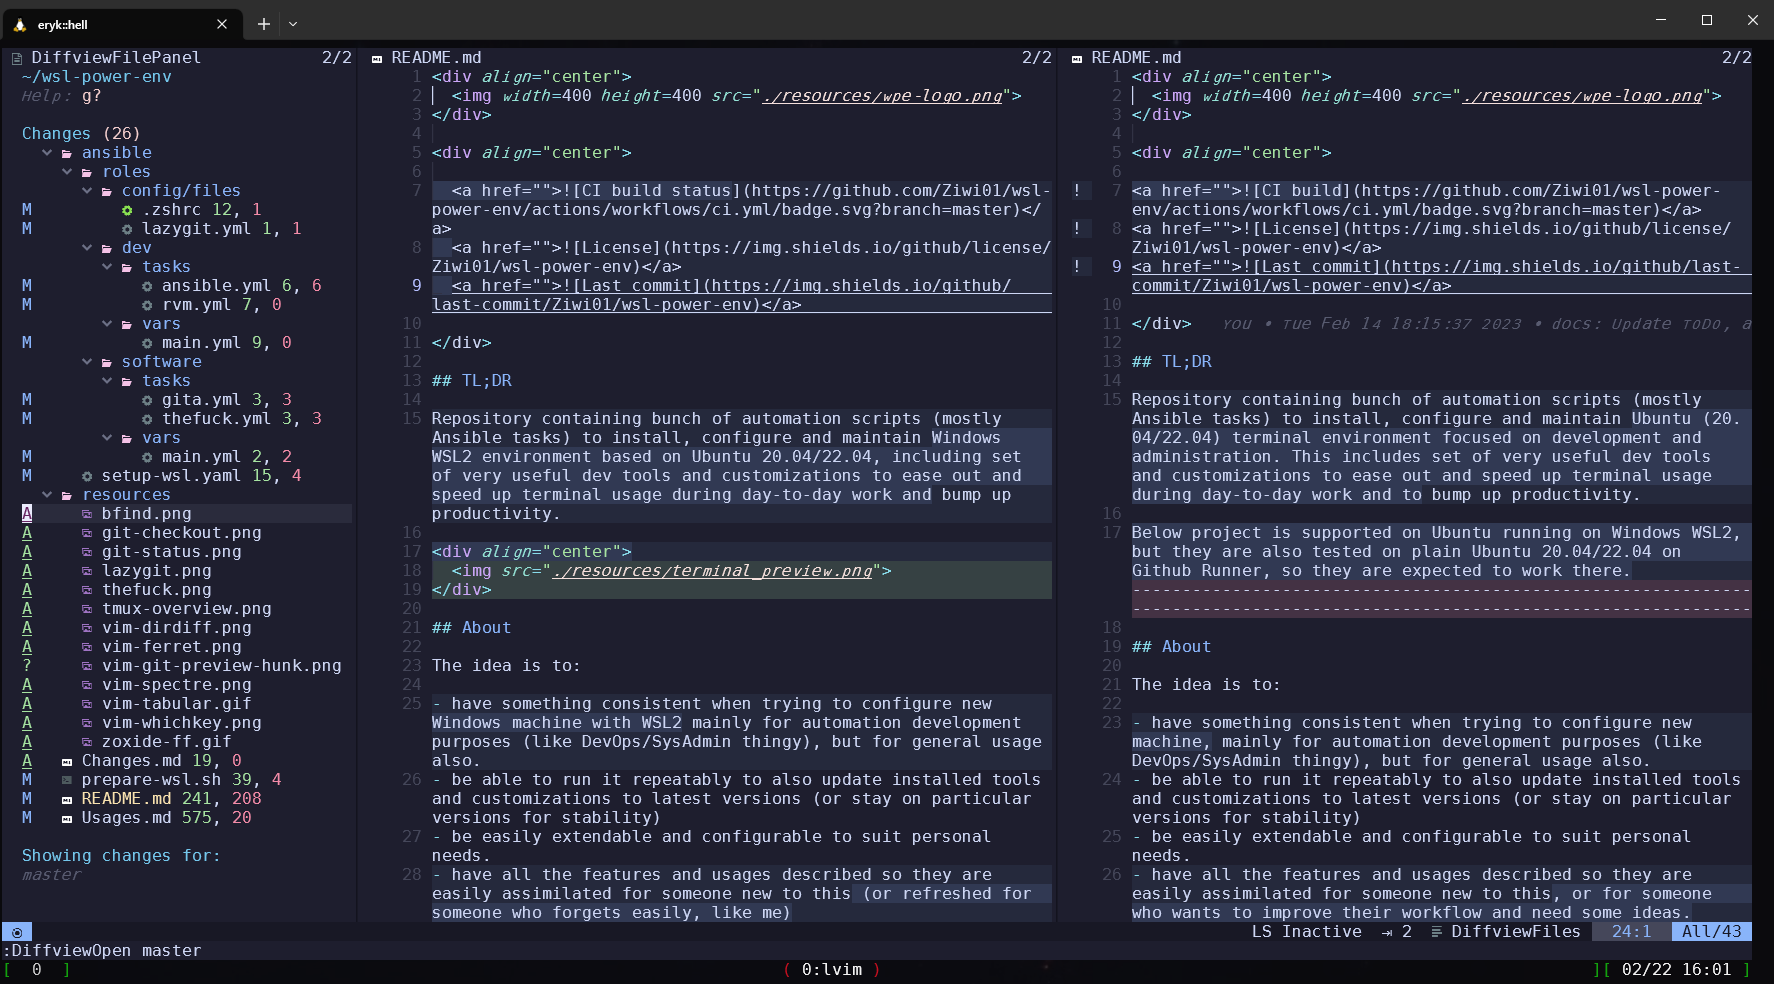
To open a nice diff between your local and other branch, run :DiffviewOpen <branch_name>. You can hit <TAB> before entering branch name so it will list available branches.
In the diffview you can cycle through the diffs or apply a left-hand side for the selection with X.
See all options with g?
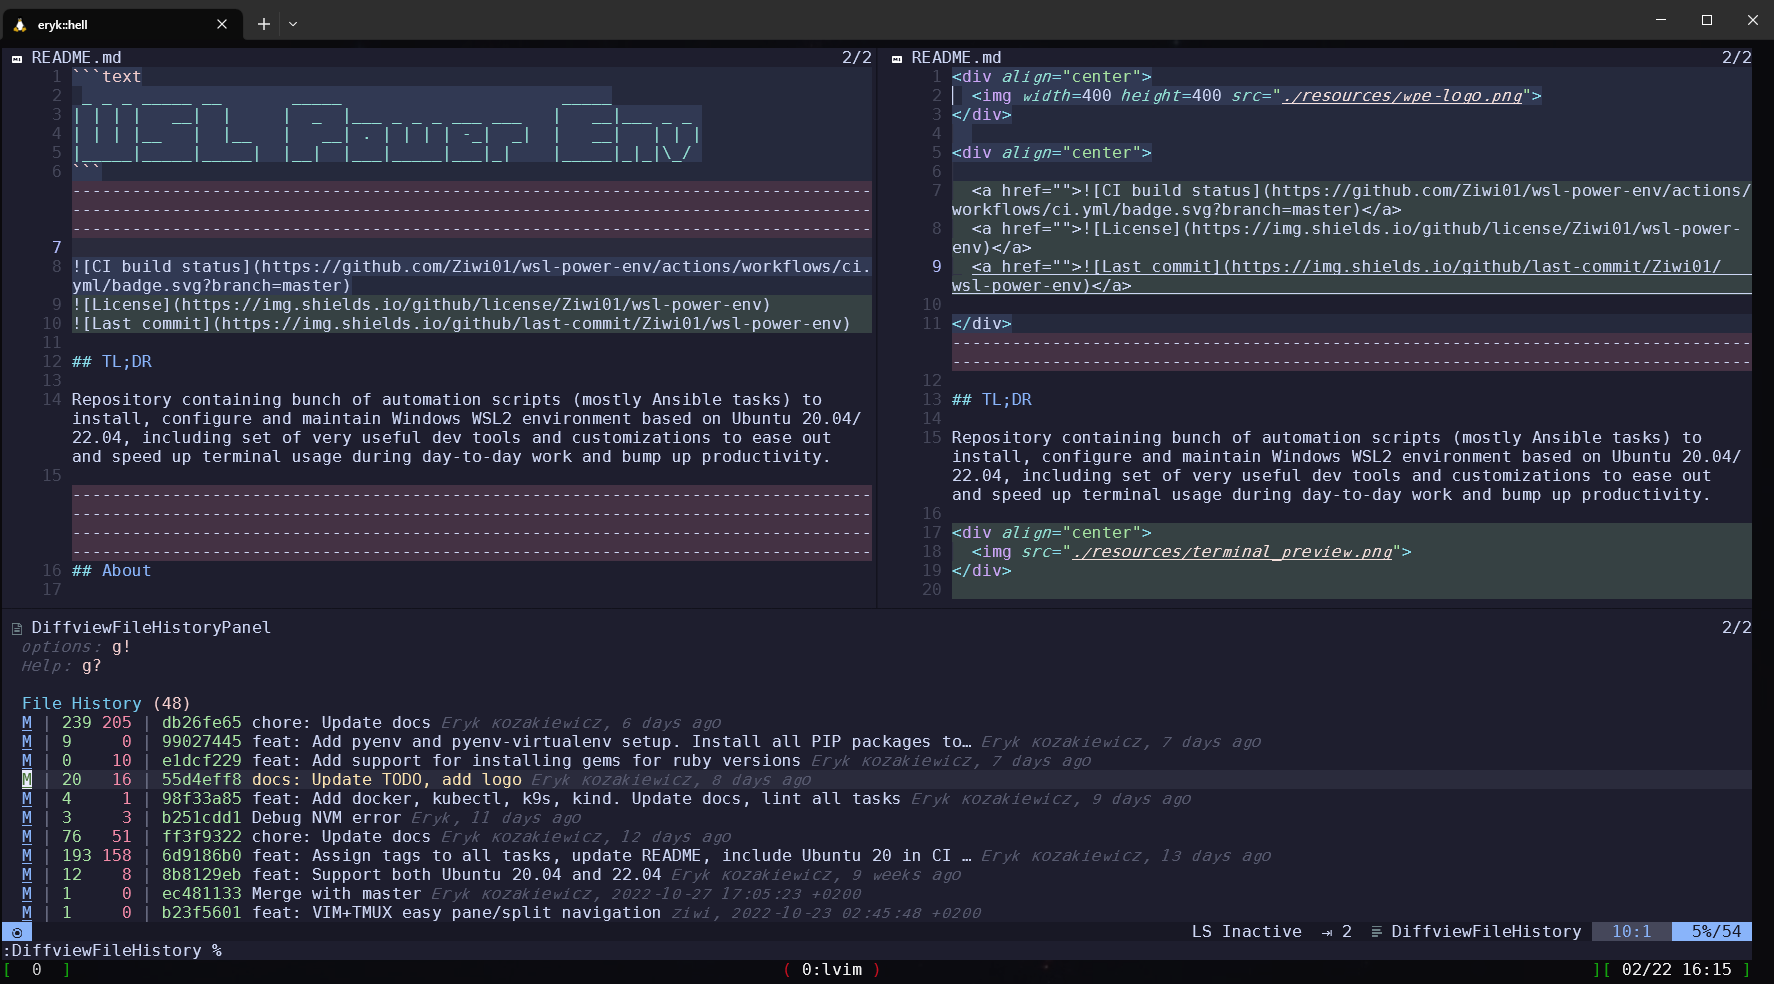
With diffview you can also browse a file history :DiffviewFileHistory.
To get changes only for this file, compared to another branch, you can use :Gvdiff <branch>
Example: Diffview another branch
Diff current file with different file on another branch
Sometimes you need to diff a file you're working on, with different branch, but on different branch the file has either different name, or is located elsewhere.
To do this, run:
:Gvdiff <branch_name>:<relative_file_path>
Conflicts resolve
If you get any conflicts after the merge, you can run :DiffviewOpen, which will show conflicts at the top, and it will use a 3-way diff (3 windows split: with current branch changes, final output and with incoming branch changes).
For simple conflict resolve you can also use Lazygit (see Lazygit section)
Checkout branch
Quickly checkout any branch with <Space>gb. Checkout to specific commit with <Space>gc. Checkout specific commit for current file with <Space>gC
Alternatively you can also checkout with :G checkout <branch>
Git blame
Basically git blame shows as a 'shadowed' text when you cycle through lines in normal mode.
To see the blame for current line more visibly, you can use <Space>gl
To toggle git blame panel for all lines (so you can easily go to specified commit), use :G blame
From this view, you can run g? to show help of what you can do, like:
<Enter>: close blame and jump to patch that added lineo: jump to patch in horizontal splitO: jump to patch in new tabp: jump to patch in preview window-: reblame at commit
File history
To get all files history, enter :DiffviewFileHistory
To get history for currently opened file: :DiffviewFileHistory %
From this view you can:
<Enter>: Open the diffy: copy the commit hash under the cursorzR: expand all folds (for all files view)L: show commit details
Diffview opens in separate tab, you can switch the tab(s) with gt (next tab) and gT (previous tab).
To close it, use :DiffviewClose or simply :tabc
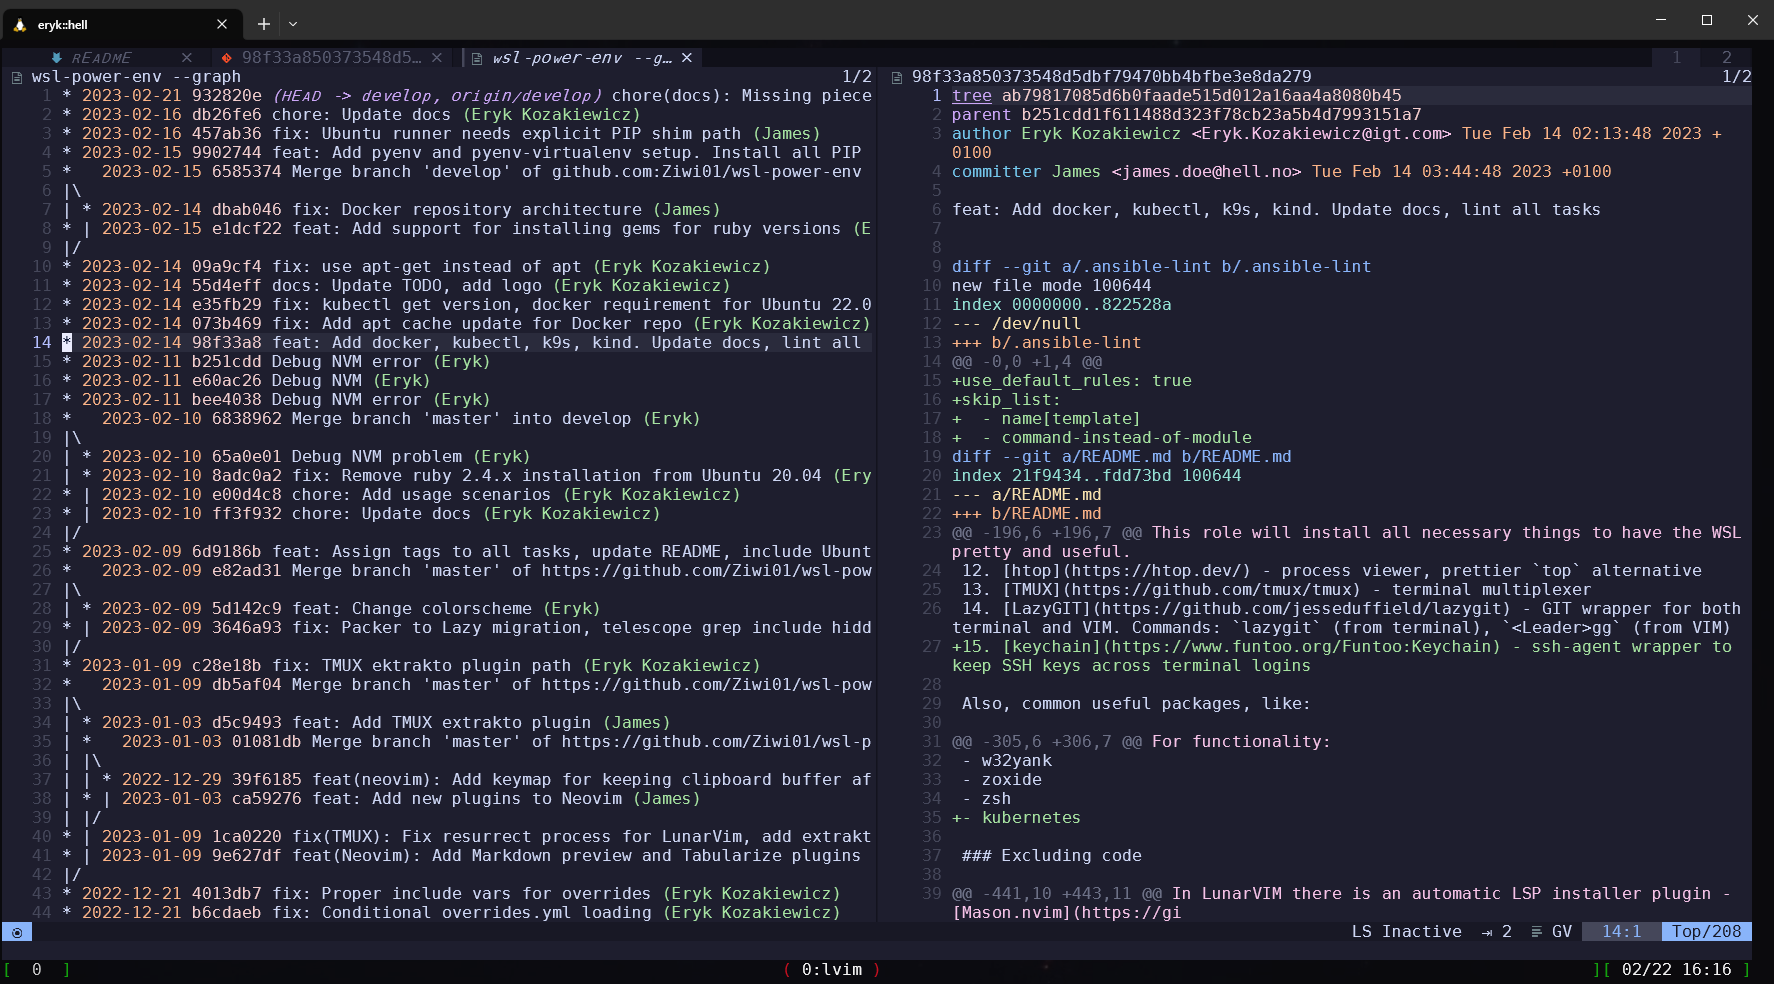
Alternatively, you can use :GV to browse all commits (<Enter> to preview this commit in split). :GV! to list only commits affecting current file. Also, you can select lines in visual mode and run :GV to show only selected lines changes.
Example: File history with Diffview
Example: File history with GV
Reload file after checkout
Sometimes when you have a file opened in a buffer and you checkout to another branch (e.g from lazygit), the file does not get reloaded automatically. There are some indications that changes occured (in left gutter panel in form of | sign).
To reload checked out changes, type :e.
Lazygit from Vim
Uses: Lazygit
Basically this is a user interface for GIT. It makes complicated things very simple (like cherry-picking commits, interactive rebasing, creating patches, moving commits between branches and much more). Please see its documentation and a video for what it can do really.
Basic usage:
- invoke Lazygit from vim with
<Space>gg. - quit it with
q - browse through windows (Status/Files/Branches/Commits) with left and right arrows
- browse through tabs in particular window with
[and](like for branches windows it would cycle through Local Branches, Remotes, Tags) - whenever you are in any view, hit
xto get the available shortucts/commands for current context. You can just<Enter>to execute them - (branches view)
<Space>to checkout branch - (branches view)
pto pull,Pto push,fon particular branch to fetch it. - (files view)
ato stage all,<Space>to stage selected,cto commit,Ato ammend previous commit
Lazygit supports conflicts resolving: when there is a conflict, you can browse through conflicted hunks, <Enter> them and select which version you want with up/down arrow keys. Then <Space> to select either hunk.
I really suggest to go through Lazygit docs/tutorial video to get to know this tool.
If there is something Lazygit can't do, you can invoke custom command by hitting : and running anything (like git pull <remote> <branch> --no-ff --no-commit or anything else)